State Project
COP-3223H
Table of Contents
1. Overview
In this project, you will implement a recognizer for multiple strings using the state machine pattern.
2. Repository setup
Log into eustis:
ssh NID@eustis.eecs.ucf.edu
Go to your local repository: Be sure you have already completed the git exercise before attempting this project.
cd ~/cop3223spring26/assignments
Create and enter a directory for the state project:
mkdir state
cd state
You only need to mkdir once to create the directory.
Make sure you are in the right directory
pwd
You should see
/home/net/NID/cop3223spring26/assignments/state
3. Create the recognizer
Make sure you are in the right directory
pwd
You should see
/home/net/NID/cop3223spring26/assignments/state
3.1. State machine for the recognizer
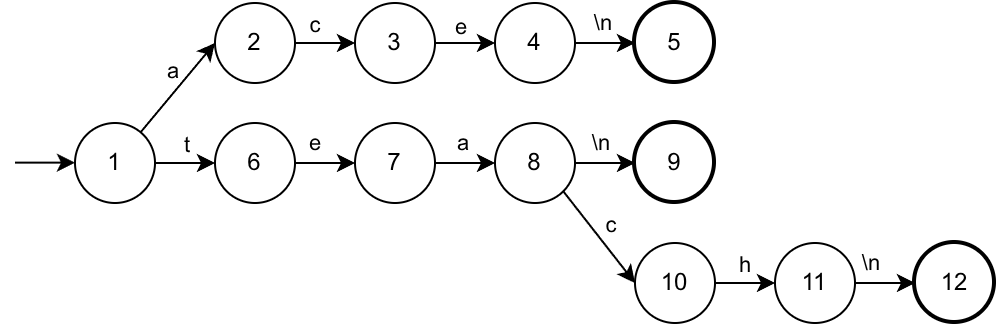
This state machine recognizes three strings: "ace\n", "tea\n", and "teach\n".
The arrow on the left show the initial state, 1. Start the machine in this state.
The characters on the arrows are the state transition. This tells you how the characters change the state. Any characters not show in a transition from some state transtion to state 13 (not shown) to represent an invalid input.
The thicker cirles on the right are the accept states that indicate a complete string has been recognized.
Compared to checking each of the three strings individual, using a state machine approach means you only check one character from the input: using something like strncmp would require reading the string three times in the worst case.
3.2. Program input
The program should use fgets to input one string. The string should be no more than 64 characters, including \n and \0, which fgets will do for you. For example,
fgets(str, maxlen, stdin);
3.3. Looping over each character in the string
Strings are \0-terminated. fgets will only read up to maxlen character and terminate the string with \0, even if that is shorter than the array size. Therefore, only loop over characters until the character is \0. Do not use \0 to transition the state.
3.4. Implementing the state machine
Use switch statements to implement the state machine by checking the current state, checking a character in the input, and updating the current state.
It may be helpful to create a state transition table, that lists each state transition, i.e., by populating the following table:
| a | c | e | h | t | |
|---|---|---|---|---|---|
| 1 | 2 | 6 | |||
| 2 | |||||
| 3 | |||||
| 4 | |||||
| 5 | |||||
| 6 | |||||
| 7 | |||||
| 8 | |||||
| 9 | |||||
| 10 | |||||
| 11 | |||||
| 12 |
The rows are the states and the columns are the characters that transition states. The first row, for state 1, is filled out for you. It shows that when you are in state 1, seeing an a character transitions you to state 2, but seeing a t character transitions you to state 6. In your implementation, if there is no transition for a given character in the state diagram, transition into state 13 (not show in the state machine or table). Once in state 13, the machine always transition back into state 13 after any input character.
3.5. Outputs
The output of the program should only be the states, one per line, that the machine enters while reading each character of the input string, including the starting state (always 1) and the final state.
If the machine enters the invalid input state (state 13) at any point, the machine should continue transitioning back into state 13.
Do not put any other text in the output (stdout).
3.6. Example outputs
If the user enters
tea
The machine should output
1
6
7
8
9
The represent the following state transitions for each character from the input, which is tea\n (the \n is added by fgets).
| State | Input | Next State |
|---|---|---|
| 1 | t |
6 |
| 6 | e |
7 |
| 7 | a |
8 |
| 8 | \n |
9 |
| 9 | (done) | (done) |
Be sure that the final state is printed.
As another example, if the user enters
tta
The machine output should be
1
6
13
13
13
The state transitions are due to the following:
| State | Input | Next State |
|---|---|---|
| 1 | t |
6 |
| 6 | t |
13 |
| 13 | a |
13 |
| 13 | \n |
13 |
| 13 | (done) | (done) |
3.7. Program name
The program must be called state.c and must be in the state directory, i.e., the full path should be
~/cop3223spring26/assignments/state/state.c
Compile and run the program whenever you make changes using
cd ~/cop3223spring26/assignments/state/
gcc -o state state.c
./state
Be sure there is no other output besides the required output as the grading will be automatic. If you would like to have debugging output, use fprintf(stderr, "...", ...); instead of printf.
4. Submitting your program via git
This assumes you have already setup your repository and that you are still in your hello directory in your repository.
4.1. Add and commit the file
Enter
git add state.c
git commit state.c
Write an appropriate commit message. Remember that you will need to save (Ctrl-x Ctrl-s) then quit (Ctrl-x Ctrl-c) the emacs editor that pops up. If you are having trouble, be sure that you have completed the git project first.
Do not commit the backup file state.c~ nor the state program. Use a .gitignore file to exclude those from the repository, so they won't show up when you type git status.
Then to synchronize the changes to the remote git repository on the grading server:
git push
5. Self-check
5.1. Remove the previous self-check
If you have already run the self-check, you can remove it like this
rm -rf ~/tmp/assignments_selfcheck
Double-check the path carefully to avoid deleting the wrong directory.
5.2. Make a fresh clone of your project
git clone gitolite3@eustis3.eecs.ucf.edu:cop3223/$USER/assignments ~/tmp/assignments_selfcheck
You should see something like
Cloning into '/home/net/NID/tmp/assignments_selfcheck'...

Welcome to eustis.eecs.ucf.edu.

Please use your NID and NID password to log in.

See http://t.cs.ucf.edu/help/eustis  for additional instructions.

remote: Enumerating objects: 16, done.
remote: Counting objects: 100% (16/16), done.
remote: Compressing objects: 100% (12/12), done.
remote: Total 16 (delta 1), reused 0 (delta 0), pack-reused 0
Receiving objects: 100% (16/16), done.
Resolving deltas: 100% (1/1), done.
If you see
fatal: destination path '/home/net/NID/tmp/assignments_selfcheck already exists and is not an empty directory.
5.3. Enter the fresh clone's directory
cd ~/tmp/assignments_selfcheck/state
5.4. Make sure state runs correctly
cd state
gcc -o state state.c
./state
6. Grading schema
| Criterion | Points |
|---|---|
| state.c exists and compiles | 1 |
| The program runs correctly, prorated by successful test cases | 3 |
| TOTAL | 4 |